Vegan Oatmeal Cookies (tofu as egg substitute)

Accepted an challenge to make dairy free baked goodies.  Tried to use tofu as egg substitute.  Texture turned out very close to real egg.  I put in too much spice but overall it is pretty decent.  Though I still miss eating real butter + egg version.

Ingredients

Quantity Unit Item
150 ml gold shortening
1/2 cup sugar
1/2  cup brown sugar
1 1/2  cup all purpose flour
1 teaspoon baking soda
1 teaspoon cinnamon
1/4 teaspoon ground ginger powder
130  g tofu
1 teaspoon vanilla extract
1/2 teaspoon lemon juice

Directions

Preheat oven to 350F.

Cream shortening & sugar until light and fluffy.  Add tofu, lemon & vanilla extract.  The consistency is actually a little stiffer than your normal batter made with egg.

Stop mixer and add flour all at once and fold in flour by hand. Then add oatmeal and raisins and mix until all are well distributed (but avoid over mixing).

Bake for 9 to 10 minutes or until golden brownie (see above picture for desire colour)

Detail Step-by-step Pictures

Use regular slow cook rolled oat for more texture.  Raisan is optional

Use regular slow cook rolled oat for more texture. Raisan is optional

Sift flour with salt, baking soda and cinnamon

Sift flour with salt, baking soda and cinnamon

Vegan oatmeal cookies batter.  Look just like normal cookies batter.

Vegan oatmeal cookies batter. Look just like normal cookies batter.

Dish out even portions and ready for baking!

Dish out even portions and ready for baking!

Done!  My first vegan oatmeal cookie. Still soft and slightly crumbly.

Done! My first vegan oatmeal cookie. Still soft and slightly crumbly.

Fresh Cranberry Coffee Cake

Cranberry Coffee Bundt Cake

I received this recipe from my co-worker’s wife many year ago (when recipe was written in index card ;-)  This cream cheese base cake has inspired me to make many wonderful butter cakes. Cream cheese is the magic ingredient that makes the cake a bit tangy and smell heavenly heavenly.  If you have kitchen aid, highly recommend you use it for this recipe. I have mixed this cake by hand and resulted in blaster in my hand because of the long creaming process.

Ingredients

Quantity Unit Item
1 cup butter (room temperature)
1 cup sugar
2 teaspoons vanilla
250 g cream cheese
3 eggs
2.5 cup all purpose flour
1/4 teaspoon salt
1 pinch nutmeg
2 teaspoons baking powder
2 cups fresh cranberries

Directions

Grease & flour a 10″ bundt pan.

Mix flour with nutmeg, salt & baking powder and set aside for later.

Put butter in the stand mixer bowl and use paddle attachment.  Add half of the sugar and mix until butter become airy and fluffy.   Then add the cream cheese and rest of sugar and continue to mix until cream cheese and completely incorporated with butter mixture and volume has doubled.  (remember stop the mixer and scrap down the side at least a couple times).

Add 1/4 cup of flour  to fresh cranberries. Toss to make sure  cranberries is well coated

Break the egg into mixing cup and add in the vanilla extract.  Lightly whisk the egg & vanilla then gradually add egg to cream cheese & butter mixture.  Add slowly at first (a couple teaspoon), then pour in steady slow stream.  Avoid over mixing because you will lost volume if you over beat the eggs.

Stop mixer and finish the rest of the mixing by hand.   Dump all flour in at once and fold the flour into batter.  Add in the cranberry and mix until it is eventually distributed.

Baking at 350F for 45 to 55 minutes or until golden brown.

Detail Step-by-step Pictures

Consistency of batter after adding all the eggs

Consistency of batter after adding all the eggs

Sift in all the flour at once

Sift in all the flour at once

Ready for baking!

Ready for baking

Only need basic lemon icing sugar glance as decoration

Only need basic lemon icing sugar glance as decoration

Liebesgrübchen – “Love Pits” jam filled sweet paste cookies

Aren’t these the most adorable looking cookies? These cookies are very buttery delicate and not overly sweet . The jam filling add just extra bonus touch of fresh sweetness. They are also pretty easy to make! I am happy my co-worker’s mom has shared this wonderful recipe with me. Thanks my co-worker for translating the recipe!

For those who can read German.  Here is the original recipe

Zutaten:

  • 175g Mehl,
  • 65g Zucker
  • 1 Packung Vanillezucker (oder 1 Teeloeffel Vanilleessenz)
  • 2 Eigelb
  • 125g Butter oder Margarine

Zubereitung:

Für die Füllung braucht man rote Marmelade, was immer man gerade hat. Die Zutaten werden zu einem Mürbeteig verarbeitet und kühlgestellt.

Anschließend formt man kleine Kügelchen aus dem Teig, macht mit einem mehlbestäubten Holzlöffelstiel eine Vertiefung (Mulde) in die einzelnen Kügelchen und füllt etwas Marmelade hinein.

Auf einem gefetteten Backblech (oder Backpapier) 10-12Min. bei ca.175°Celsius backen.

Here is the translation! ;-)

Ingredients:

  • 175g flour ( I used pastry flour)
  • 65g sugar
  • 1 package of vanilla sugar (I still have my very limited supply from my last Germany trip back in 2010 ;-)  You can also substitute with half a vanilla bean or 1 teaspoon of vanilla extract)
  • 2 egg yolks (this is the key why these cookies are so delicate!)
  • 125g butter (I used unsalted butter with a tiny pinch of salt)
  • ~3 tablespoon of your favourite jam – recently I have been using Maple Syrup Pumpkin and I really like it!
All the ingredients

All the ingredients

It is actually very simple. You put together all the above ingredients  following sweet paste method.  The key is don’t warm up and cream you better to incorporate too much air.  Just mix sugar and butter until all evenly incorporated.  Add your yolks gradually, and sift all the flour into the butter mixture at once.  The cookies dough will turn out a bit wet and too soft to handle.  You should warp the dough in plastic warp and put it in the fridge for at least a couple hours (better yet, over night).  Then they will be much easier to handle.

Dough is ready! Always remember to put in "date" & "name"!!

Dough is ready! Always remember to put in "date" & "name"!!

When you are ready to bake this cookies, just take the dough out and evenly portion the dough.  I like to use my ice-cream scoop for quick & easy portioning.   You then roll out the cookie dough into perfectly roll balls.  Then use top of wooden spoon to poke a hole in the middle for filling jam. Be careful when you are poking that hole, you  don’t want to push all the way down to the bottom because jam will be leaking!

Dip tip of wooden spoon in flour before poking a hole in cookie dough to avoid sticking

Dip tip of wooden spoon in flour before poking a hole in cookie dough to avoid sticking

Perfectly even holes punched into the cookies dough and ready for filling with jam!

Perfectly even holes punched into the cookies dough and ready for filling with jam!

Remember  to leave some space in between because this dough will spread

Remember to leave some space in between because this dough will spread

Baking in 350F oven for 10 minutes.

Taiyaki (たい焼き)

Finally I got this fishy pan!!  I bought this from Seoul.  During travel, I always like to bring back bake-ware as souvenir for myself.  Not only this is practical and useful, using that tool/utensil bring your back to the trip.  It also brings back fond memory where I have bought that and how I sometime has to guess what certain tool is for  from language that I  don’t understand.

Taiyaki

This is such a basic and simple snack to make!  Including making my own home-made custard filling, it only took 35 minutes to make this yummy “fishy” cake =).

Fishy Pan, simple basic batter and home-made custard filling

Fishy Pan, simple basic batter and home-made custard filling

Here is the Taiyaki Batter from Cooking With Dog – How to Make Taiyaki たい焼きの作り方:

  • 100g Cake Flour (3.53 oz)
  • 2/3 tsp Baking Soda
  • 2 tbsp Sugar
  • 1/2 Egg (30g/1.06 oz)
  • 100ml Water (3.38 fl oz)
You just need to mix together the above ingredients (make sure no lumps!).  Then lightly oil the heated pan and pour in batter, add favour filling of your choice (red bean paste is awesome too!). Add more batter on top and cook in medium high heat.  Cook until fish is pretty and golden brown!
Really pretty!  Love'em

Really pretty! Love'em

Highly recommend you check out the following youTube video for detail steps!  Really helpful!

Sweet Christmas Gift – Christmas Cookies

Christmas Cookies Platter

So glad that I can make use of the cookies making I’ve learned from Chef Macro from the Pastry Training Centre of Vancouver.

My own Scottish shortbread & gingerbread stars are certainly tasty but can look a bit boring in a huge cookie plate.  By adding cookies with names that I am still learning to pronounce, all of a sudden the whole cookie plate looks a lot more interesting.   The top snow white cookies with silver balls decoration is Pfeffernüsse.  The shell like cookies next to Pfeffernüsse are Spekulatius.  There is my personal favourite: Elisenlebkuchen  (but I am still hopeless in saying that German name correctly =P).  At the centre is my own creation of rolling Scottish shortbread little balls into match (green tea) powder and icing sugar.  There is also very neat looking checker-board cookies.  I even created those four tiny swirl pattern cookies with side trimming (did not waste a bit).  That is a pretty impressive collection eh?

The following is gift set of six different kind of cookies:

  • peppermint candy cane biscotti with chocolate drizzle
  • Vanille Kipferl (yes more German name, you know the theme of my baking course ;-)
  • marble cookies
  • “BMW” style checker-board cookies
  • Pfeffernüsse
  • Spekulatius

Cookies Gift Set

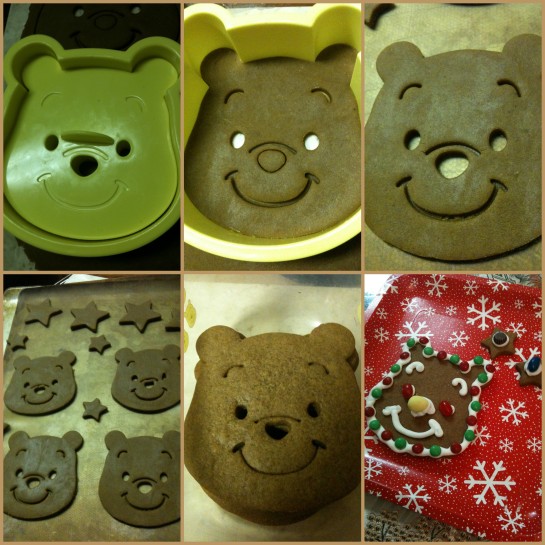
Finally as fun activity for my good friends’ kids. I made a stack of “Winnie the Pooh” gingerbread cookies for the little ones to decorate. I had a blast decorating with them. They probably enjoyed the 6 bowls of different type of candies lay out for decoration more than the actual decorating part. That is just the greatest Christmas memory that I will always cherish.
Making of Winnie the Pooh Gingerbread Cookies

Instead of buying a gift card or another electronic gadgets for your friends, consider making them a batch of home made cookies. It is a lot of fun making and consuming =)

Late Fall Apple & Cranberry Pie

Apple Pie

Made the crust with Crisco classic pie crust recipe a couple weeks ago and it has been sitting inside the fridge waiting for the right filling.  Finally I saw really a large bag of local BC Spartan appples and I knew I have found the perfect filling.  The apples were small (only 2 inches tall).  it was a lot of work to peel and cut the apples but it all worth every single minutes peeling & cutting!

Started with rolling out half of the double crust recipe for bottom of 9″ glass pie dish (which is a cheap *must have* bake ware!)

Bottom of pie crust

Bottom of pie crust

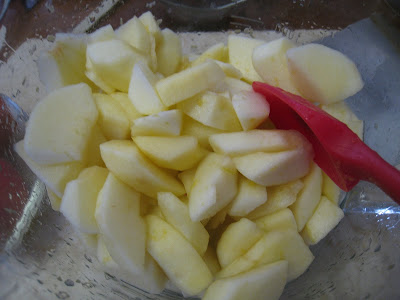
6 cups of apple peel and sliced.  I also added a bit of lemon zest (for added fresh favour) and juice from one lemon to prevent the apple from browning.   I have also added 1/2 cup of dried sweeten cranberries into the apple to naturally sweeten the pie filling without adding more sugar.

Prepare 6 cups of apples

Prepare 6 cups of apples

In a small mixing bowl, add 1/4 cup of all purpose flour, 1/3 cup of brown sugar, 1 teaspoon of cinnamon and 1/2 teaspoon of nutmeg.  Mix until everything is all blended and no more lump of brown sugar

Thickening sugar/flour mixture for apple filling

Thickening sugar/flour mixture for apple filling

Mix flour mixture with apple + cranberries and the filling is DONE!  Cannot get any  simpler than this eh!

Fillings ready

Filling ready

Cover the top with remaining pie crust – do remember to roll out the top crust a bit larger than bottom. Since the filling is pretty high, you need large to to fully cover.  I did very very basic side trimming so it looks a little interesting.  But after baking, the side trimming pattern did not show =P

Covered top crust with slightly decorate the edge

Covered top crust with slightly decorate the edge

Brushed with 1 teaspoon of melted butter and sprinkle about 1 tablespoon of sugar on top.  This ensure the top of crust will brown nicely.   Covered the edge with foil to avoid over-baking the side.

Ready for baking!

Ready for baking!

The World of Cookies

This past few weeks have been very busy at work.  Hence no blog post update for a month.   I am so glad that even in a very busy week, I could make time (by getting up before 7am and going to bed after 4am) to take my 3rd baking course “The World of Cookies” from chef Marco’s Pastry Training Centre of Vancouver.  I have learned so much and this is definitely the most fun course so far!

You probably make thing anyone can make cookies why bother taking a course.  But the cookies covered is not just the ordinary cookies.  Making them feel like making “dim sum” of pastry.  Small piece of wonder that requires lots of different technique if you want to present a collection of display that can “wow” people.

Base on the following ingredients, can you guess what kind of cookies we are trying to make?
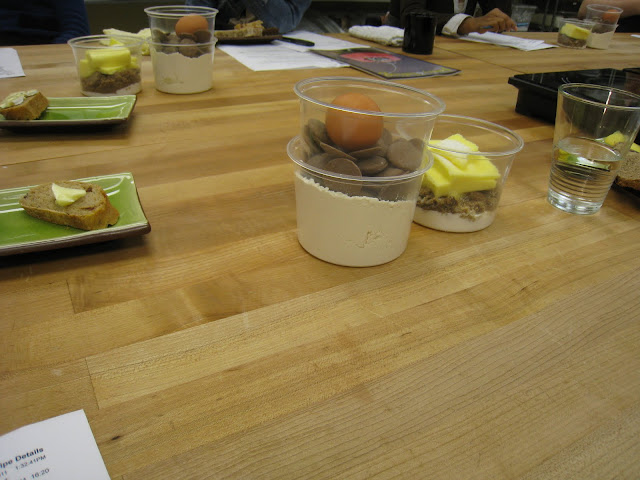
ingredients of the first cookies - chocolate chips cookies (chef macro way)

ingredients of the first cookies - chocolate chips cookies (chef macro way)

We started with the American classic chocolate chips cookies but this is made with real chocolate instead of  never melt during baking chocolate chips.  The resulting cookies have rich caramelized taste with wonderful melt in your mouth chocolate felt.   It is also really nice to learn recipe that can make by hand without bring out kitchen aids.  It is petty nice upper body workout ;-)

Already looking very impressive and colour with only portion of the cookies display
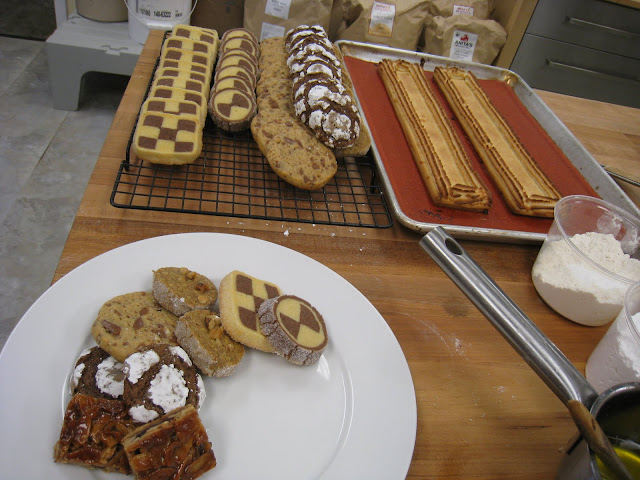
start arranging cookies for display

start arranging cookies for display

Beautiful eisenbahner & linzer (aka hazelnut cookies).  Eisenbahner is the main reason why I take this course and I loved it.  The look and taste is amazing and sophisticated that you simply cannot buy it from regular bakery.
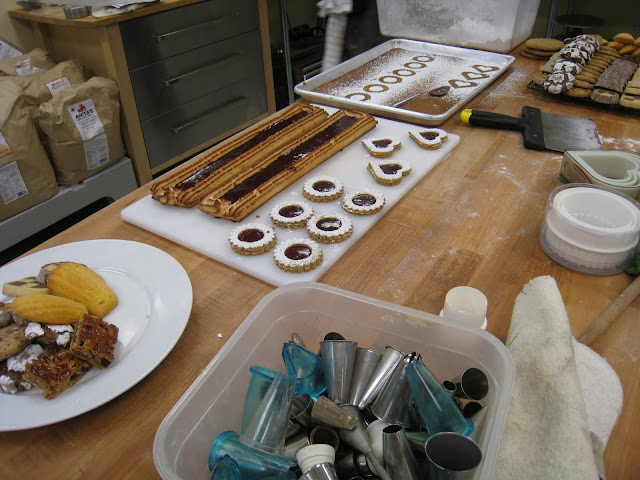
Eisenbahner &; linzer cookies

Eisenbahner & linzer cookies

Learned a couple cookies I have never heard of before: Fianacier  & Florentine .  I really like Florentine (the following pictures) because it so rich yet well balanced with a rather delicate sweat paste bottom.  It was such a smart combo that is rich but not unbearably sweet like most  regular cut square cookies
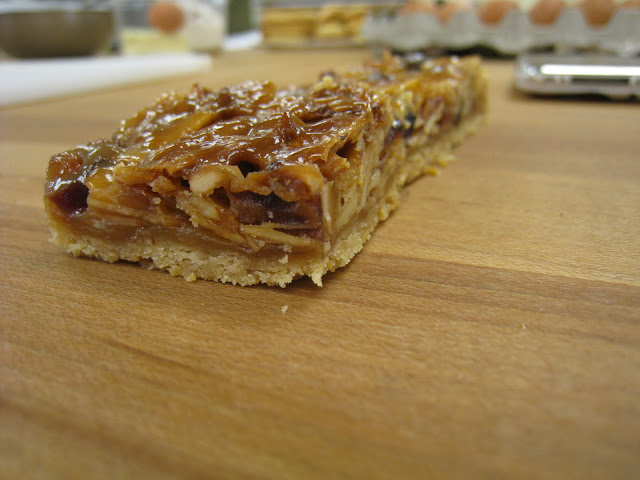
Florentine

Florentine

Really enjoy this course and I am going back to for more.  Signed up Christmas cookies.  Looking forward to learning making more interesting little wonders of pastry world – cookies :-)

Chocolate Chips Cookies

Browsing my list of recipe and find I actually never post the most basic cookie recipe.  This is because I never come across a recipe that I really like the result until I found this from very interesting post about “A Day in the Life of an Intern-Making the Perfect Chocolate Chips Cookie“.  It is so neat to have peak into such a “sweet” intern job.

Here is the ingredients:

  • 1 1/2 cups of butter (I used unsalted butter, so I added in 1/4 teaspoon of salt to the recipe)
  • 1 1/4 cup of sugar
  • 1 1/4 cup of firmly packed brown sugar
  • 2 eggs
  • 1 tablespoon of vanilla
  • 1 teaspoon of baking powder
  • 1 teaspoon of baking soda
  • 2 cup of chocolate chips ( I used 1 cup of chocolate chips + 1 cup of  chocolate fudge chips)
Sift flour, salt, baking powder, baking soda together and set aside.
With stand mixer, using paddle attachment in medium speed, cream butter with sugar & brown sugar until fluffy and light.  Then in measurement cup, lightly beat the eggs & vanilla and gradually pour in the egg mixture to sugar butter mixture.
Preheat oven to 375F.  Then take mixing bowl out and use hand and spatula to mix the flour into batter. I find hand mixing flour result in more tender cookie and you have less flour flying in your kitchen ;-)
Scope out the cookie with ice-cream disher on parchment paper (or silicon baking sheet) lined cookie sheet.  The cookie will grow!!  So remember to leave a lot of space in between.
Baking 8 Cookies per Sheet

Baking 8 Cookies per Sheet

Look closer, notice I have split the perfect round scope of cookie dough a half and reattached together.  This result in a slightly rough edge (more natural) look.  The cookie can spread more evenly with this slight alternation!  Only take a few more minute but make a huge difference.  Highly recommend this method.
Split and Reattached Cookie Dough

Split and Reattached Cookie Dough

Bake for 10 to 11 minutes until beautifully golden brown.

Done Baking after 10 to 11 minutes

Done Baking!

I am very happy with the result of the cookie.  I like using both baking powder and baking soda for a slightly more puffy cookie.  Using just baking soda will result in much flatter and crispier cookie which not the way I like it.  I will definitely make this recipe again but I need to  find a way to reduce sugar without affecting resulting texture.  2 1/2 cup of sugar + brown sugar is indeed too much.   Too sweet for my taste.